k-teams portal (or in short 'k-teams', 'application' or 'portal') is a web application helping teams of data professionals to organize and be productive in their day-to-day work.
This document is structured into five sections
-
Getting started with k-teams: a very short introduction into k-teams
-
Taking a Quick Test Ride: running k-teams locally for evaluation
-
Installing k-teams for team usage: installation guide
-
Using k-teams: A Manual: the user manual and main usage concepts
-
Configuration and Administration: details of adjusting k-teams to your needs
1. Getting started with k-teams
k-teams comes as a Docker Container Image, often referred to as a 'docker'. For a good introduction into that technology, see https://docker-curriculum.com/.
Container images offer a versatile way of running software — locally, on-premise, in public and private clouds — and independently of operating systems and resources.
The container image is publicly available here: https://hub.docker.com/r/kteams/kteams-portal. You can browse that page to check for available releases of k-teams.
The currently recommended version is tagged day20230726.
The k-teams portal is not the only container used to make k-teams work, but it’s the central component. Later in this manual more containers are used. Some of them are provided by k-teams itself, others by third parties like the jupyter project.
2. Taking a Quick Test Ride
If you’re familiar with running containers and you want to give k-teams a quick spin, here you go:
docker run -ti -p 8080:8080 kteams/kteams-portal:day20230726 --initialUserEmail=teamsmanager@example.org --initialUserName="First User"
If not already existing locally, Docker will now begin to download the container image. When ready, the k-teams portal application will be started and you should see output like the following:
2023/07/26 10:24:29 copyright 2022-2023, all rights reserved.
2023/07/26 10:24:29 no db dialect given, chosing defaults.
2023/07/26 10:24:29 db connection parameter: dialect = "sqlite3", connection = "./kteams.sqlite3.db"
2023/07/26 10:24:29 database opened
2023/07/26 10:24:29 preparing database model, with auto migration
2023/07/26 10:24:29 auth mode changed to value "internal"
2023/07/26 10:24:29 middleware is in "release" mode
2023/07/26 10:24:29 setting workspace auto-approval from 'false' to 'false'
2023/07/26 10:24:29 internal service url default kept: http://localhost:8080/
2023/07/26 10:24:29 0 saved settings have been loaded from DB
2023/07/26 10:24:29 set kteams instance id to "kt-inst-cdcsgmacbe"
2023/07/26 10:24:29 no users in the database!
2023/07/26 10:24:29 system is in initializing mode!
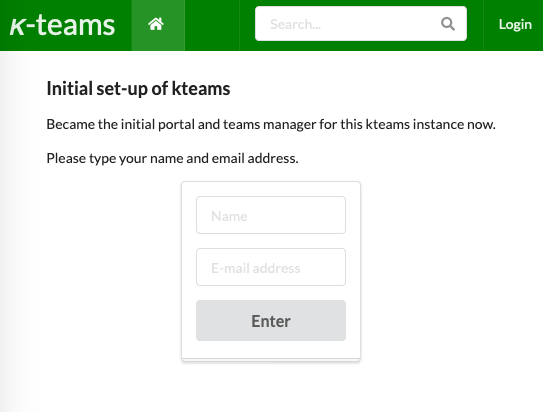
2023/07/26 10:24:29 initial user ("teamsmanager@example.org", "First User") has been created as portal and teamsmanager.
2023/07/26 10:24:29 initial setup completed, 'initializing state' disabled.
2023/07/26 10:24:29 starting portal "kt-inst-cdcsgmacbe" on 0.0.0.0:8080The final line (line 12) containing starting portal signals that k-teams has successfully started. Congratulations, you’re now ready to go!
|
Caution
|
Since you have not specified a database for k-teams yet, all data is lost as soon as you stop the application. See the following sections how to configure durable storage for k-teams. |
Now, on the machine where you started the container, you can access the portal from a browser window under the URL http://localhost:8080.
|
Note
|
If you use you’re company login ("single sign on" (SSO)/IAM/etc.) you will be redirected there and won’t see k-teams' login screen. Using a separate enterprise level login system is recommended and mandatory in most larger organisations. For now, it’s fine to work with this built-in login. |
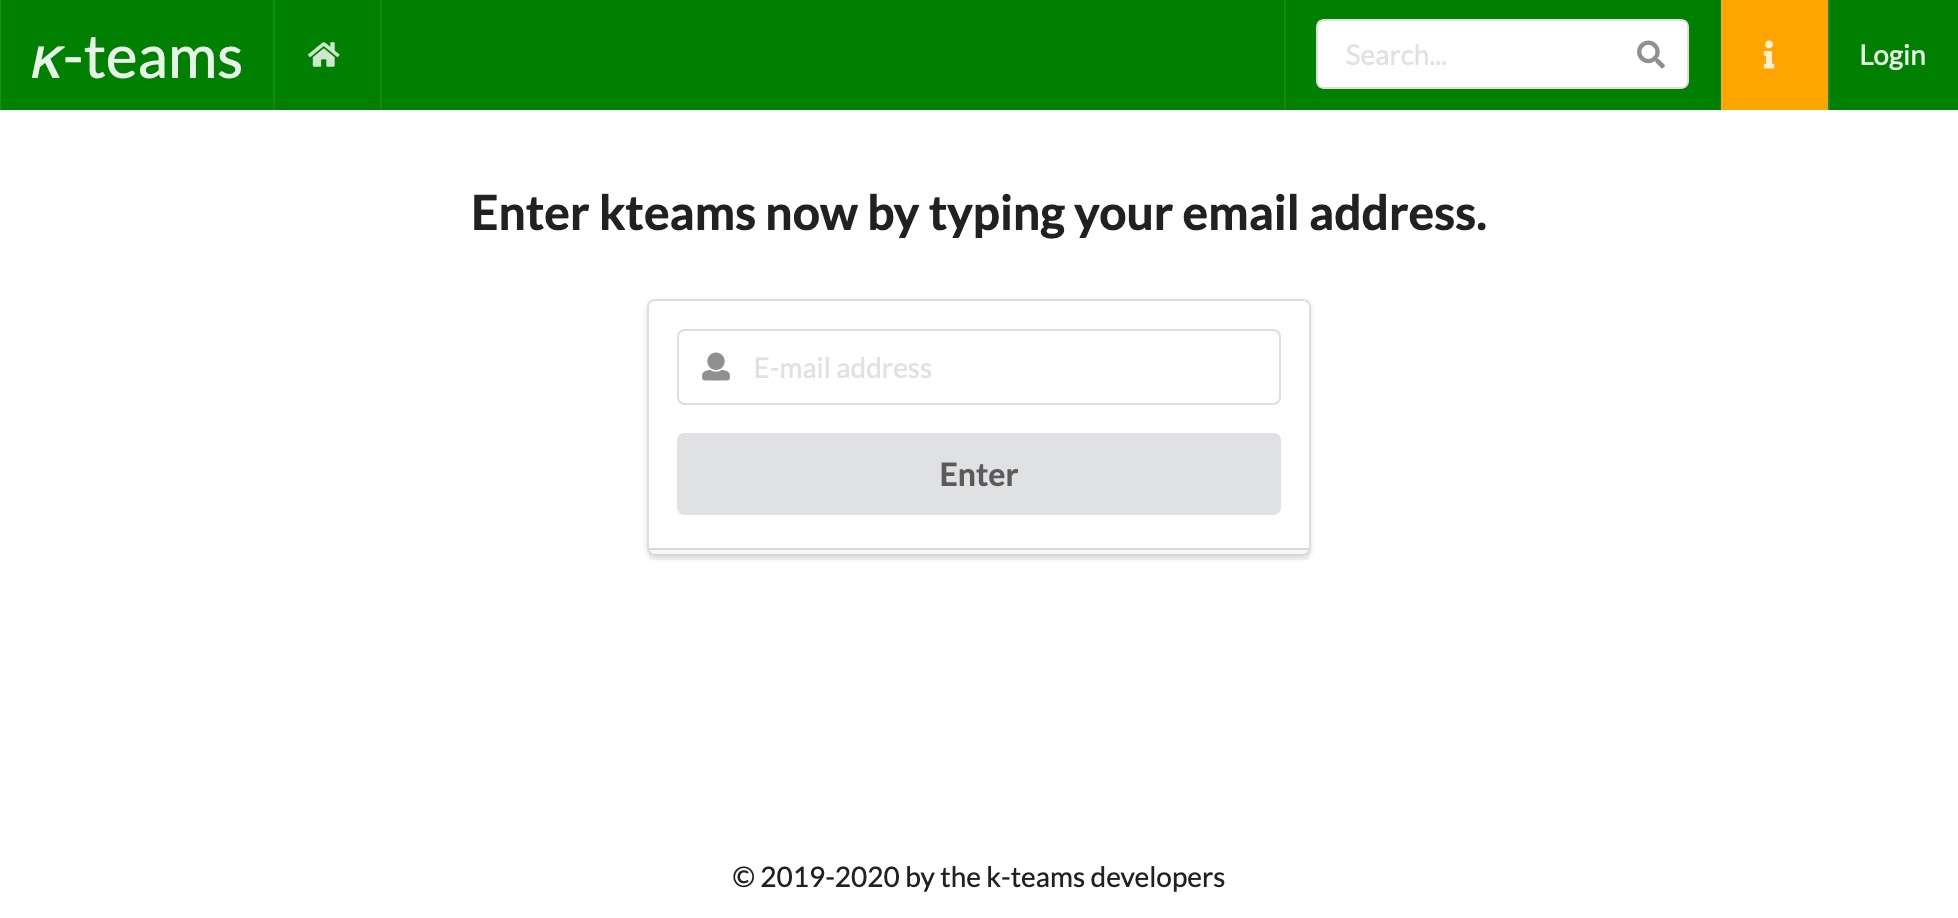
After entering the email address you used in the docker statement above (teamsmanager@example.org in our example), you will be requested to fill in a token:
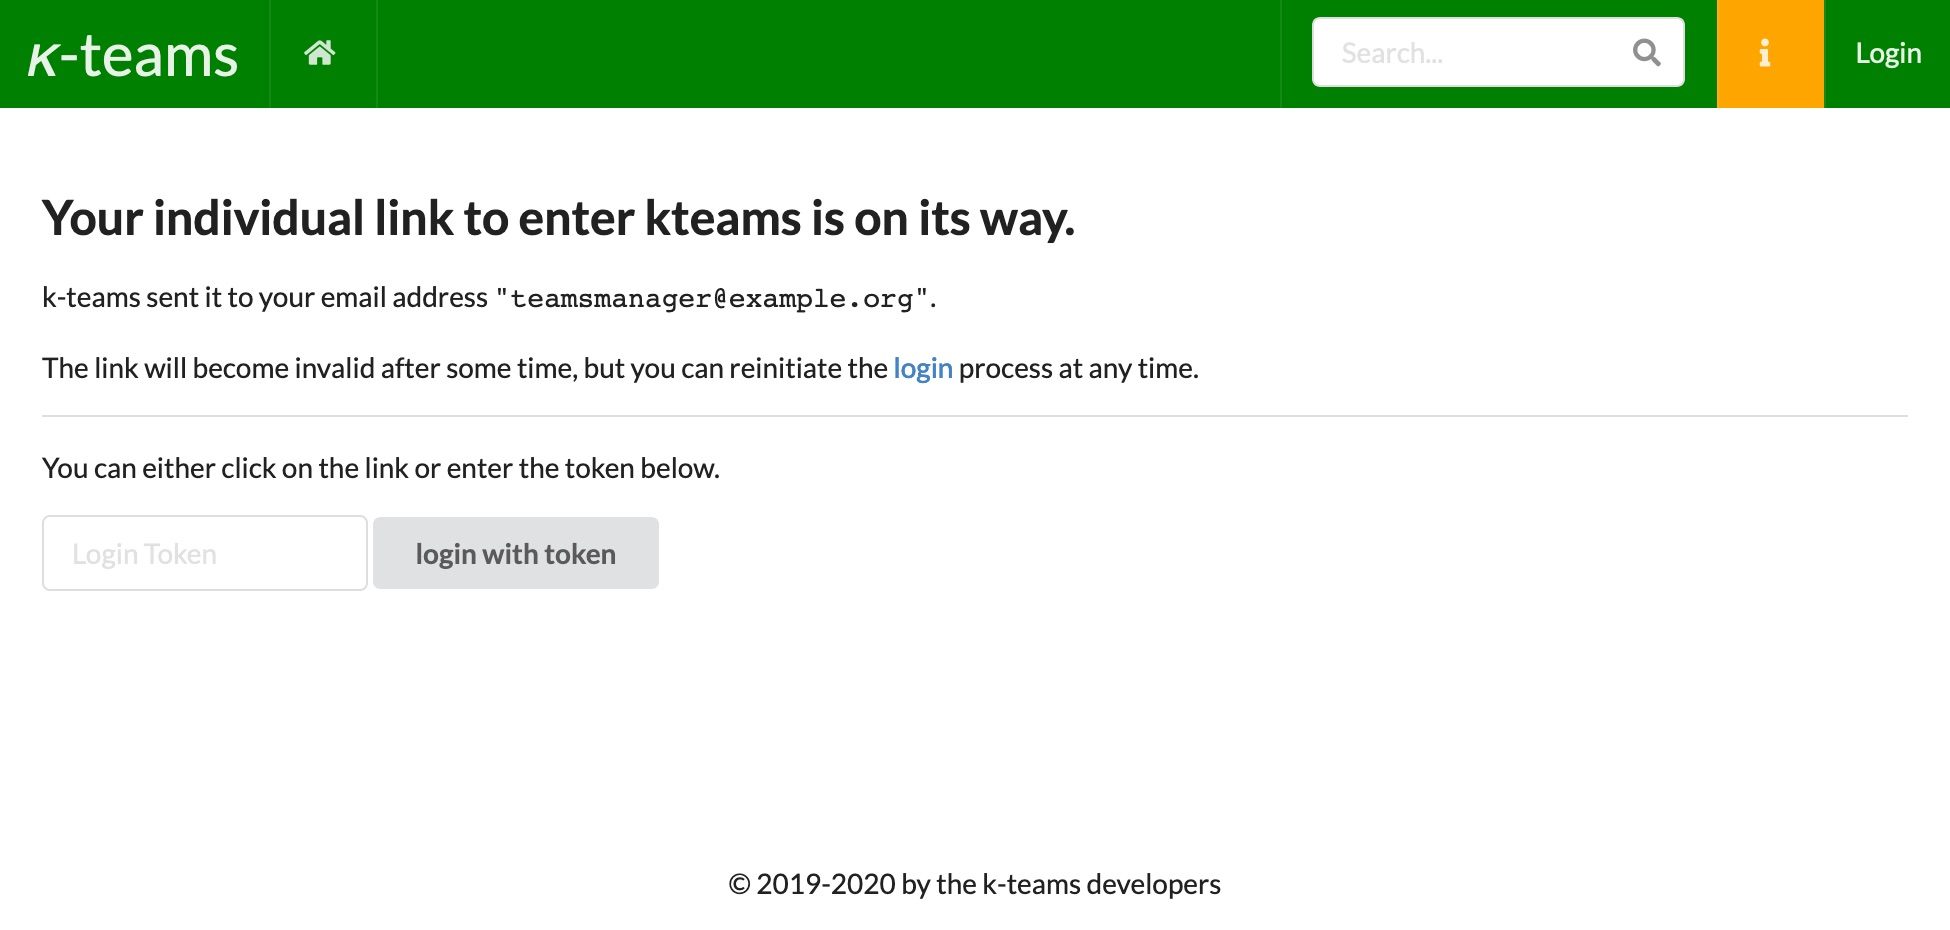
You can fetch the token from the logs of the application you started:
2023/07/26 10:28:17 handling login request, does a session already exist: false
2023/07/26 10:28:17 login token added: "ccrdmmkfma"
2023/07/26 10:28:17 failed sending mail, insufficient outbound server configuration.|
Note
|
The token (ccrdmmkfma in our example), is randomly generated every time. It will be valid for a short time only. But you can request a new token at any time. |
|
Note
|
Later, you will be able to suppress login tokens from being displayed for confidentiality reasons. Also, an email server will be configured to actually send out the tokens by email to the actual user. |
After copying it to the browser input and hitting the button labelled "login with token", k-teams greets you with the account management screen:
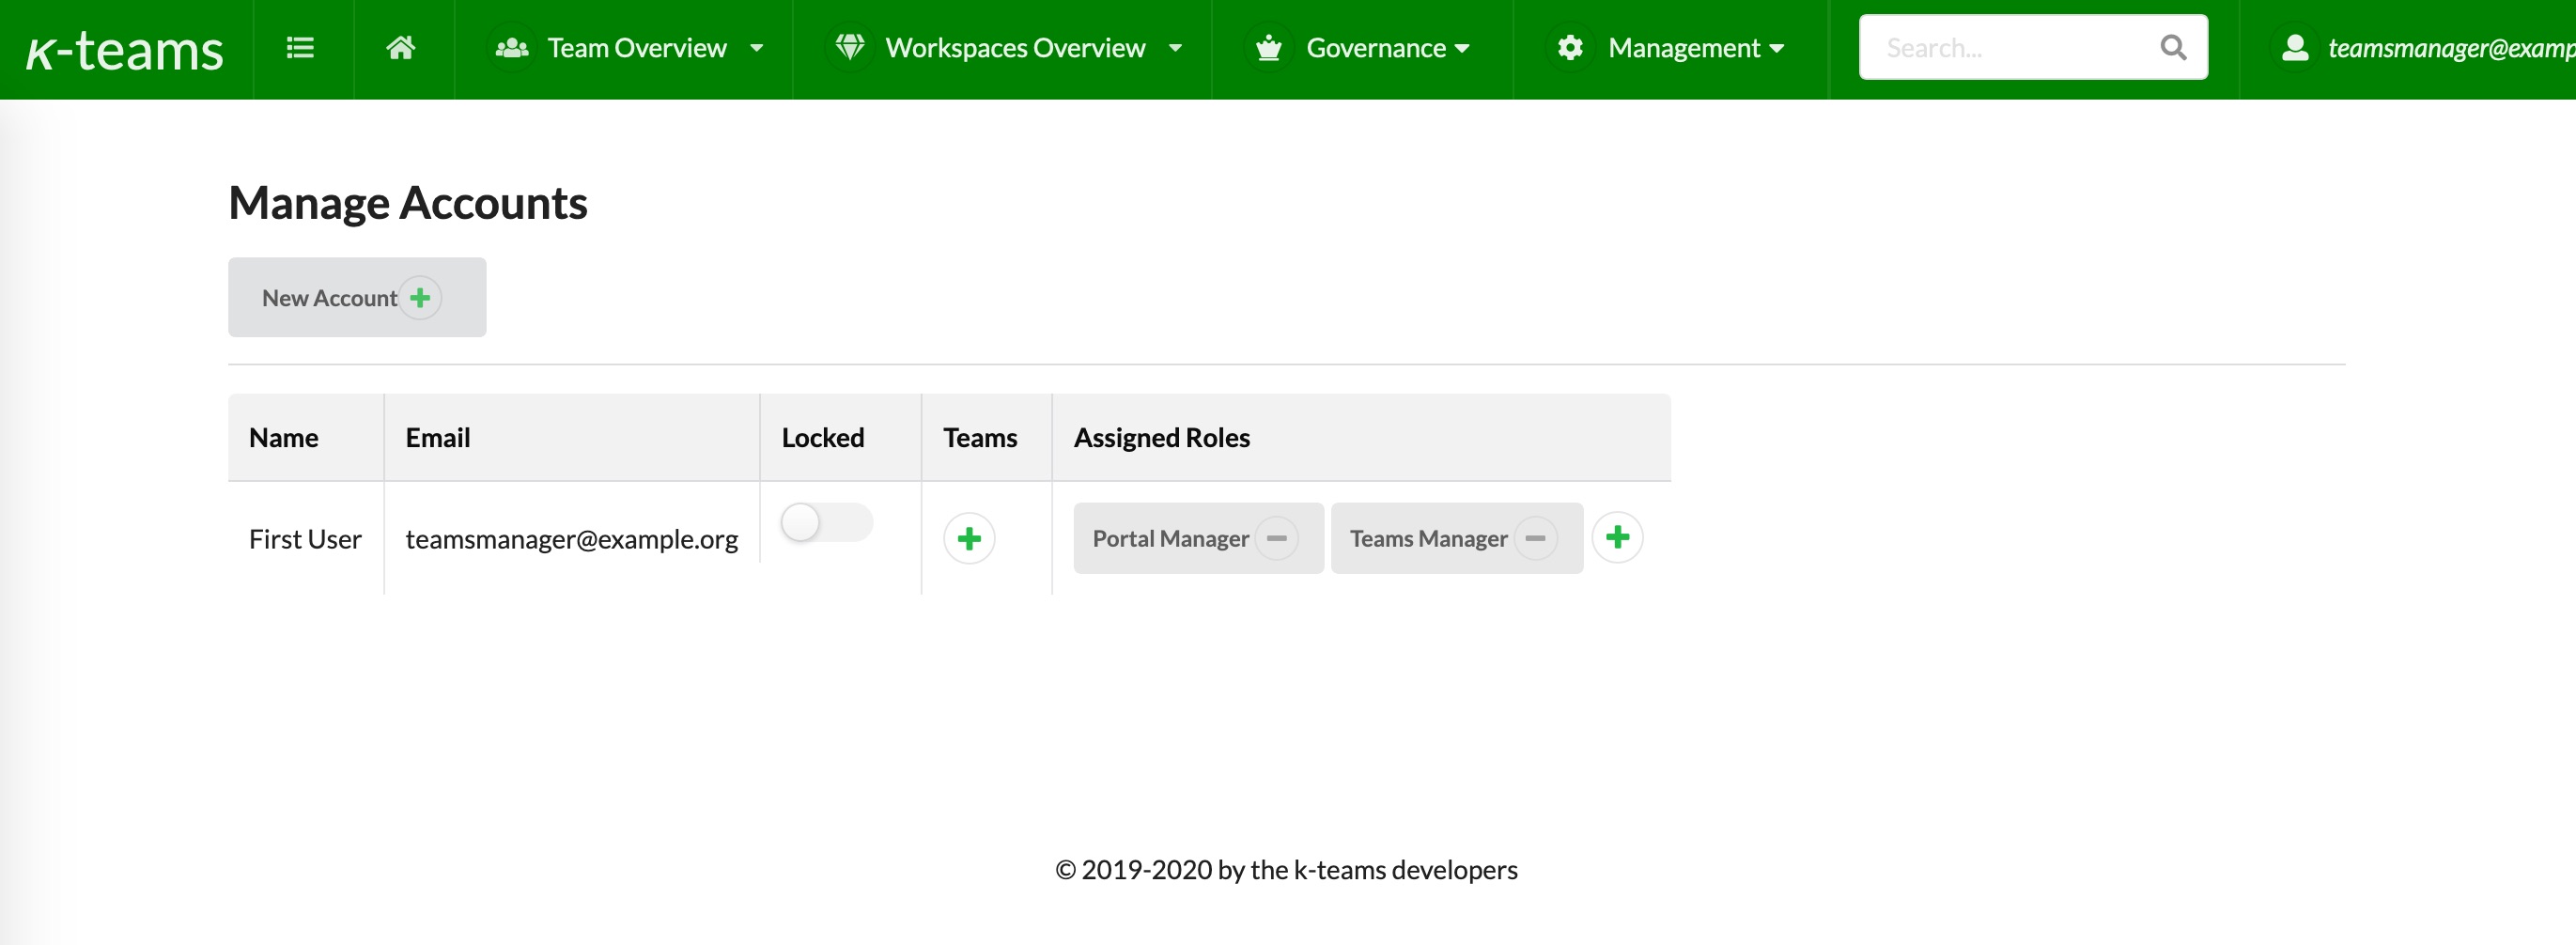
You now have successfully entered k-teams and you have full control.
|
Tip
|
If you’d like us to do a demo for you, and explain all of k-teams for you, directly contact us. |
3. Installing k-teams for team usage
3.1. Step 1: Deciding the runtime environment
Do you already know where to deploy your k-teams container? Great! However, there are so many options, we need to go through them carefully
|
Important
|
There will be more information about choosing the proper environment soon. |
3.2. Step 2: Storing k-teams data in a database
k-teams typically requires external storage if you don’t want to loose any data. There are two basic approaches to do that:
-
Provide file storage for the embedded database
-
Provide a connection to some database server. This server runs separately from the k-teams application.
|
Note
|
We strongly recommend to choose the second option for a production environment. |
If you are in evaluation, test or in a very small setup, the first option might be convenient, too. It is also the default, out-of-the box configuration. See the section "Default Storage" below.
There are two options for configuring the database, dbType and dbConnection, which always go interlocked. The content of dbConnection depends on the database flavor you choose in dbType.
You must append both parameters to the command line starting the docker container. This will override the default storage:
docker run -ti -p 8080:8080 kteams/kteams-portal:day20230726 --dbType=sqlite --dbConnection="kteams.sqlite3.db"3.2.1. Default storage
Out-of-the box, k-teams uses sqlite3, a wide-spread embedded database, writing to the local file kteams.sqlite3.db. This file is part of the docker container, and won’t be retained when the container stops. You loose all data.
Docker containers support making outside durable storage available to a container, via volume mounts. As k-teams runs in a Docker container you can and should provide durable storage to the container via a volume mount.
The default storage settings are equivalent to running the following k-teams container:
docker run kteams/kteams-portal:day20230726 --dbType=sqlite --dbConnection="kteams.sqlite3.db"To provide the local directory /path/to/my/file/storage/ to k-teams, run k-teams like this:
docker run -ti -v /path/to/my/file/storage/:. -p 8080:8080 kteams/kteams-portal:day202307263.2.2. Using postgreSQL
If you have a postgreSQL database available, you can let k-teams use it by appending proper dbType and dbConnection command line parameters. The value of dbConnection heavily relies on your postgreSQL setup and configuration and is beyond the scope of this document. See more in the postgreSQL v10 documentation.
For example:
docker run -ti -p 8080:8080 kteams/kteams-portal:day20230726 --dbType=postgres --dbConnection="dbname=kteams host=192.168.3.4 port=5432 user=postgres sslmode=disable"Note that this example assumes that you created a database kteams and user postgres beforehand and that the server is reachable via port 5432 on IP 192.168.3.4 and does not support SSL connections. Your configuration might be very different.
4. Using k-teams: A Manual
As soon as k-teams is up and running, you want to start using it. It’s helpful to first introduce the major concepts behind k-teams.
4.1. Project Teams
k-teams is targeted to different groups of users, but the first and foremost user group we build this platform for is composed of what we call 'data professionals'. Everyone who is deeply into data (but less into source code) is a data professional, be it a Data Scientist, Data Engineer, Data Analyst, Data XZY… We assume and actually recommend that Data Professionals form teams to work on actual projects. Thus, a 'Team' is a first-order construct in k-teams. If you are still working by yourself, please reconsider, especially if you’re working for a company, or 'in an enterprise context', as we like to put it. Companies have special needs. These needs are best satisfied by having teams which provide continuity and a diverse set of knowledge.
A Team’s work can span from exploring initial data sets with only a very small group of people, up to a larger group with very diverse skills bringing a data solution into production, maintaining it and iterating by making it better and a successful product for their sponsors.
The world of data professionals is getting more complex every day, see also this illustrative video "What are the different roles in data science?" from Raj Ramesh. That’s what we’ve build k-teams for.
Therefore, the teams within k-teams have the following properties:
-
A list of members, with different roles. The member list might change over time.
-
A sponsor. The sponsor sets the team’s initial goal and funds it’s resources. The sponsor isn’t involved in the day-to-day business, but has a vetted interest in the successful work of the team.
-
A Team name, so others can find or relate to you
-
A mission statement, expressing the objective the team needs to keep in mind to be able to go into the right direction.
-
A list of workspaces. Every team needs at least one workspace, but can have many. It depends on your mode of operation, company policies and ultimatively the mission of the team. Much more about workspaces later.
-
A public and private documentation. The public documentation can be seen by everyone and is the team’s billboard for exposing their work to a larger audience, suggest sharing data or promote great algorithms. It’s about doing great things and talk about it. The private documentation can be used to onboard new team members, discuss intermediate work results etc., which generally is not of concern outside the team.
4.2. The Teamsmanager: Overall teams management and approval
For a company, someone needs to create the first team and continues to look after them. This is the role "teamsmanager". The first person with k-teams access needs to be granted teamsmanager. Others can assume this role, too, later. However, at any given time there needs to be someone taking the teamsmanager role.
The duties of the teamsmanager are onboarding new users, assigning them to teams, and approving team requests for new tools and datasets.
Teammanagers act as the custodians for a conformant and consistent use of k-teams within an organisation.
4.3. The Infrastructure Operator: Provisioning tools and datasets
Letting teams work on data means also to keep them away as much from setting up and messing with infrastructure. While often the process of provisioning infrastructure can be automated, organisations have special needs with regards to where and how their infrastructure is set up, named, backed up and secure. This is much better left to non-data experts. k-teams assigns these tasks to user bearing the role "Infrastructure Operator". All approved resource requests from all teams land on his desk. He then will provision them according to company standards, which is when they become accessible to the team. k-teams already makes a good suggestion how to actually provision the resources.
4.4. Workspaces and Datasets
Workspaces is where you’ll find yourself most of the time working with k-teams. Looking at workspaces, we finally find the thing k-teams was built for: being productive with data. And the Dataset concept delivers everything you need to work with data. Plus, it does so in an enterprises-like way: in a controlled manner. Your team and your organisation get a lot more benefits from k-teams.
So Workspaces contain Datasets. But not every dataset is the same. Some are used in evaluation, exploration and testing, others are destined for production, contain sensitive data etc. To clearly distinguish between working in production and other maturity phases of data, every workspace has a maturity label attached to it, like "lab", "exploration", "development", "production" or others.
5. Configuration and Administration
5.1. Database
By default, k-teams uses a non-durable file-based database. This is typically not what you want. Instead, you want your data to survive a restart. Therefore, k-teams supports connecting to and using popular stand-alone databases.
On startup you can select the database flavor and supply a connection to the database as well as database user credentials. This selection is controlled by the two parameters --dbType and --dbConnection.
5.1.1. Options for specifying the database
There are two options for configuring the database.
| option name | default value | purpose |
|---|---|---|
dbType |
sqlite |
the kind of database used, must be one of 'sqlite', 'postgresql', 'mssql' or 'mysql', identifiying the database system |
dbConnection |
default value |
the connection string used by the database client. the value depends on the the dialect. |
The --dbType parameter supports the following values, each representing a well-known database product:
| parameter value | database product | comment |
|---|---|---|
sqlite3 |
this is the default |
|
postgres |
||
mysql |
||
mssql |
Providing detailed information on how to connect to each of these databases and thus how the value for --dbConnection is looking is out-of-scope of this document, yet some more detail information is given for SQLite (in the quick start) and postgreSQL (below).
5.1.2. Simple deployment with PostgreSQL on kubernetes
Assumptions:
-
You have admin access to a running kubernetes cluster, that means you can create namespaces, list and create deployments.
-
It is also assumed you have created a namespace named
kteams. -
Furthermore, you are familiar with applying resource definitions using "kubectl apply" or other means.
The following kubernetes resource definitions will create a PostgreSQL deployment, complete with intial user and password, the service where k-teams can connect and 5 GB of storage.
The only change we recommend in advance is to change the value for postgresadmin_password.txt to a solid password of your own. Please remember to enter the BASE64-encoded value of the password, not the raw password.
---
apiVersion: apps/v1
kind: Deployment
metadata:
  name: kteams-database
  labels:
    app: kteams-database
  namespace: kteams
spec:
  replicas: 1
  selector:
    matchLabels:
      app: kteams-database
  template:
    metadata:
      labels:
        app: kteams-database
    spec:
      containers:
      - name: kteams-database
        image: postgres:10
        imagePullPolicy: "IfNotPresent"
        ports:
          - containerPort: 5432
        env:
        - name: POSTGRES_PASSWORD
          valueFrom:
            secretKeyRef:
              name: kteams-database-admin-password
              key: postgresadmin_password.txt
        - name: PGDATA
          value: /var/lib/postgresql/data/pgdata
        volumeMounts:
        - mountPath: /var/lib/postgresql/data
          name: postgredb
      volumes:
      - name: postgredb
        persistentVolumeClaim:
          claimName: kteams-database-pvc
---
apiVersion: v1
kind: PersistentVolumeClaim
metadata:
  name: kteams-database-pvc
  namespace: kteams
spec:
  accessModes:
  - ReadWriteOnce
  resources:
    requests:
      storage: 5Gi
  #storageClassName: non-default-storage-class
---
apiVersion: v1
kind: Secret
metadata:
  name: kteams-database-admin-password
  namespace: kteams
type: Opaque
data:
  "postgresadmin_password.txt": dGhpc2lzbm90YXByb3BlcnBhc3N3b3Jk
---
apiVersion: v1
kind: Service
metadata:
  name: kteams-database-service
  namespace: kteams
spec:
  ports:
  - port: 5432
    protocol: TCP
    targetPort: 5432
  selector:
    app: kteams-database
  sessionAffinity: None
  type: ClusterIP
It’s now quite easy to run k-teams portal and make it use the database:
---
apiVersion: apps/v1
kind: Deployment
metadata:
  name: kteams-portal-deployment
  labels:
    app: kteams-portal
  namespace: kteams
spec:
  replicas: 1
  selector:
    matchLabels:
      app: kteams-portal
  template:
    metadata:
      labels:
        app: kteams-portal
    spec:
      containers:
        - name: kteams-portal
          image: kteams/kteams-portal:day20230726
          ports:
            - containerPort: 8080
          env:
            - name: KTEAMS_PORTAL_NAMESPACE
              valueFrom:
                fieldRef:
                  fieldPath: metadata.namespace
            - name: POSTGRES_PASSWORD
              valueFrom:
                secretKeyRef:
                  name: kteams-database-admin-password
                  key: postgresadmin_password.txt
          args: ["--dbType=postgres", "--dbConnection", "dbname=postgres sslmode=disable host=kteams-database-service.kteams port=5432 user=postgres password=$(POSTGRES_PASSWORD) sslmode=disable"]
        - name: kubectl-apply-server
          image: kteams/kubectl-apply-server-1-25:day20230726
          ports:
            - containerPort: 9091
---
apiVersion: v1
kind: Service
metadata:
  name: kteams-portal-service
  namespace: kteams
spec:
  ports:
  - name: web
    port: 8080
    protocol: TCP
    targetPort: 8080
  selector:
    app: kteams-portal
  sessionAffinity: None
  type: ClusterIP
---
5.2. Login and Authentication
By default, k-teams authenticates users by a simple internal mechanism, based on login tokens send by email to the user. Passwords are not supported. The reason is, that in an organisation users typically already have a login and they like to use it for all their tools including k-teams. It would not make sense to built this into k-teams itself, when there are excellent integrations available, see the next chapters. k-teams supports connecting to the most widely used Identity and Access Management (IAM) systems. There are common mechanisms such tools provide for "single-sign on". k-teams currently supports oauth2, which is supported by most of the IAM tools, including public clouds.
5.2.1. Configuring Authentication in the portal
The parameter --authMode let’s you switch authentication. It currently supports two modes:
| option value | purpose |
|---|---|
internal |
this is the token-based login (default) |
oauthproxy |
uses a component called oauth2-proxy directly attached to k-teams portal, which can make use of a long list of providers using oauth2. |
We recommend to use the oauthproxy mode for non-evaluation deployments.
5.2.2. Deploy k-teams with oauthproxy
|
Important
|
There will be more information about how to use oauth-proxy soon. |
5.3. Important Settings
5.3.1. The Settings dialog
teammanagers and portalmanagers can reach the settings dialog via the menu Management/Settings. It looks like this:
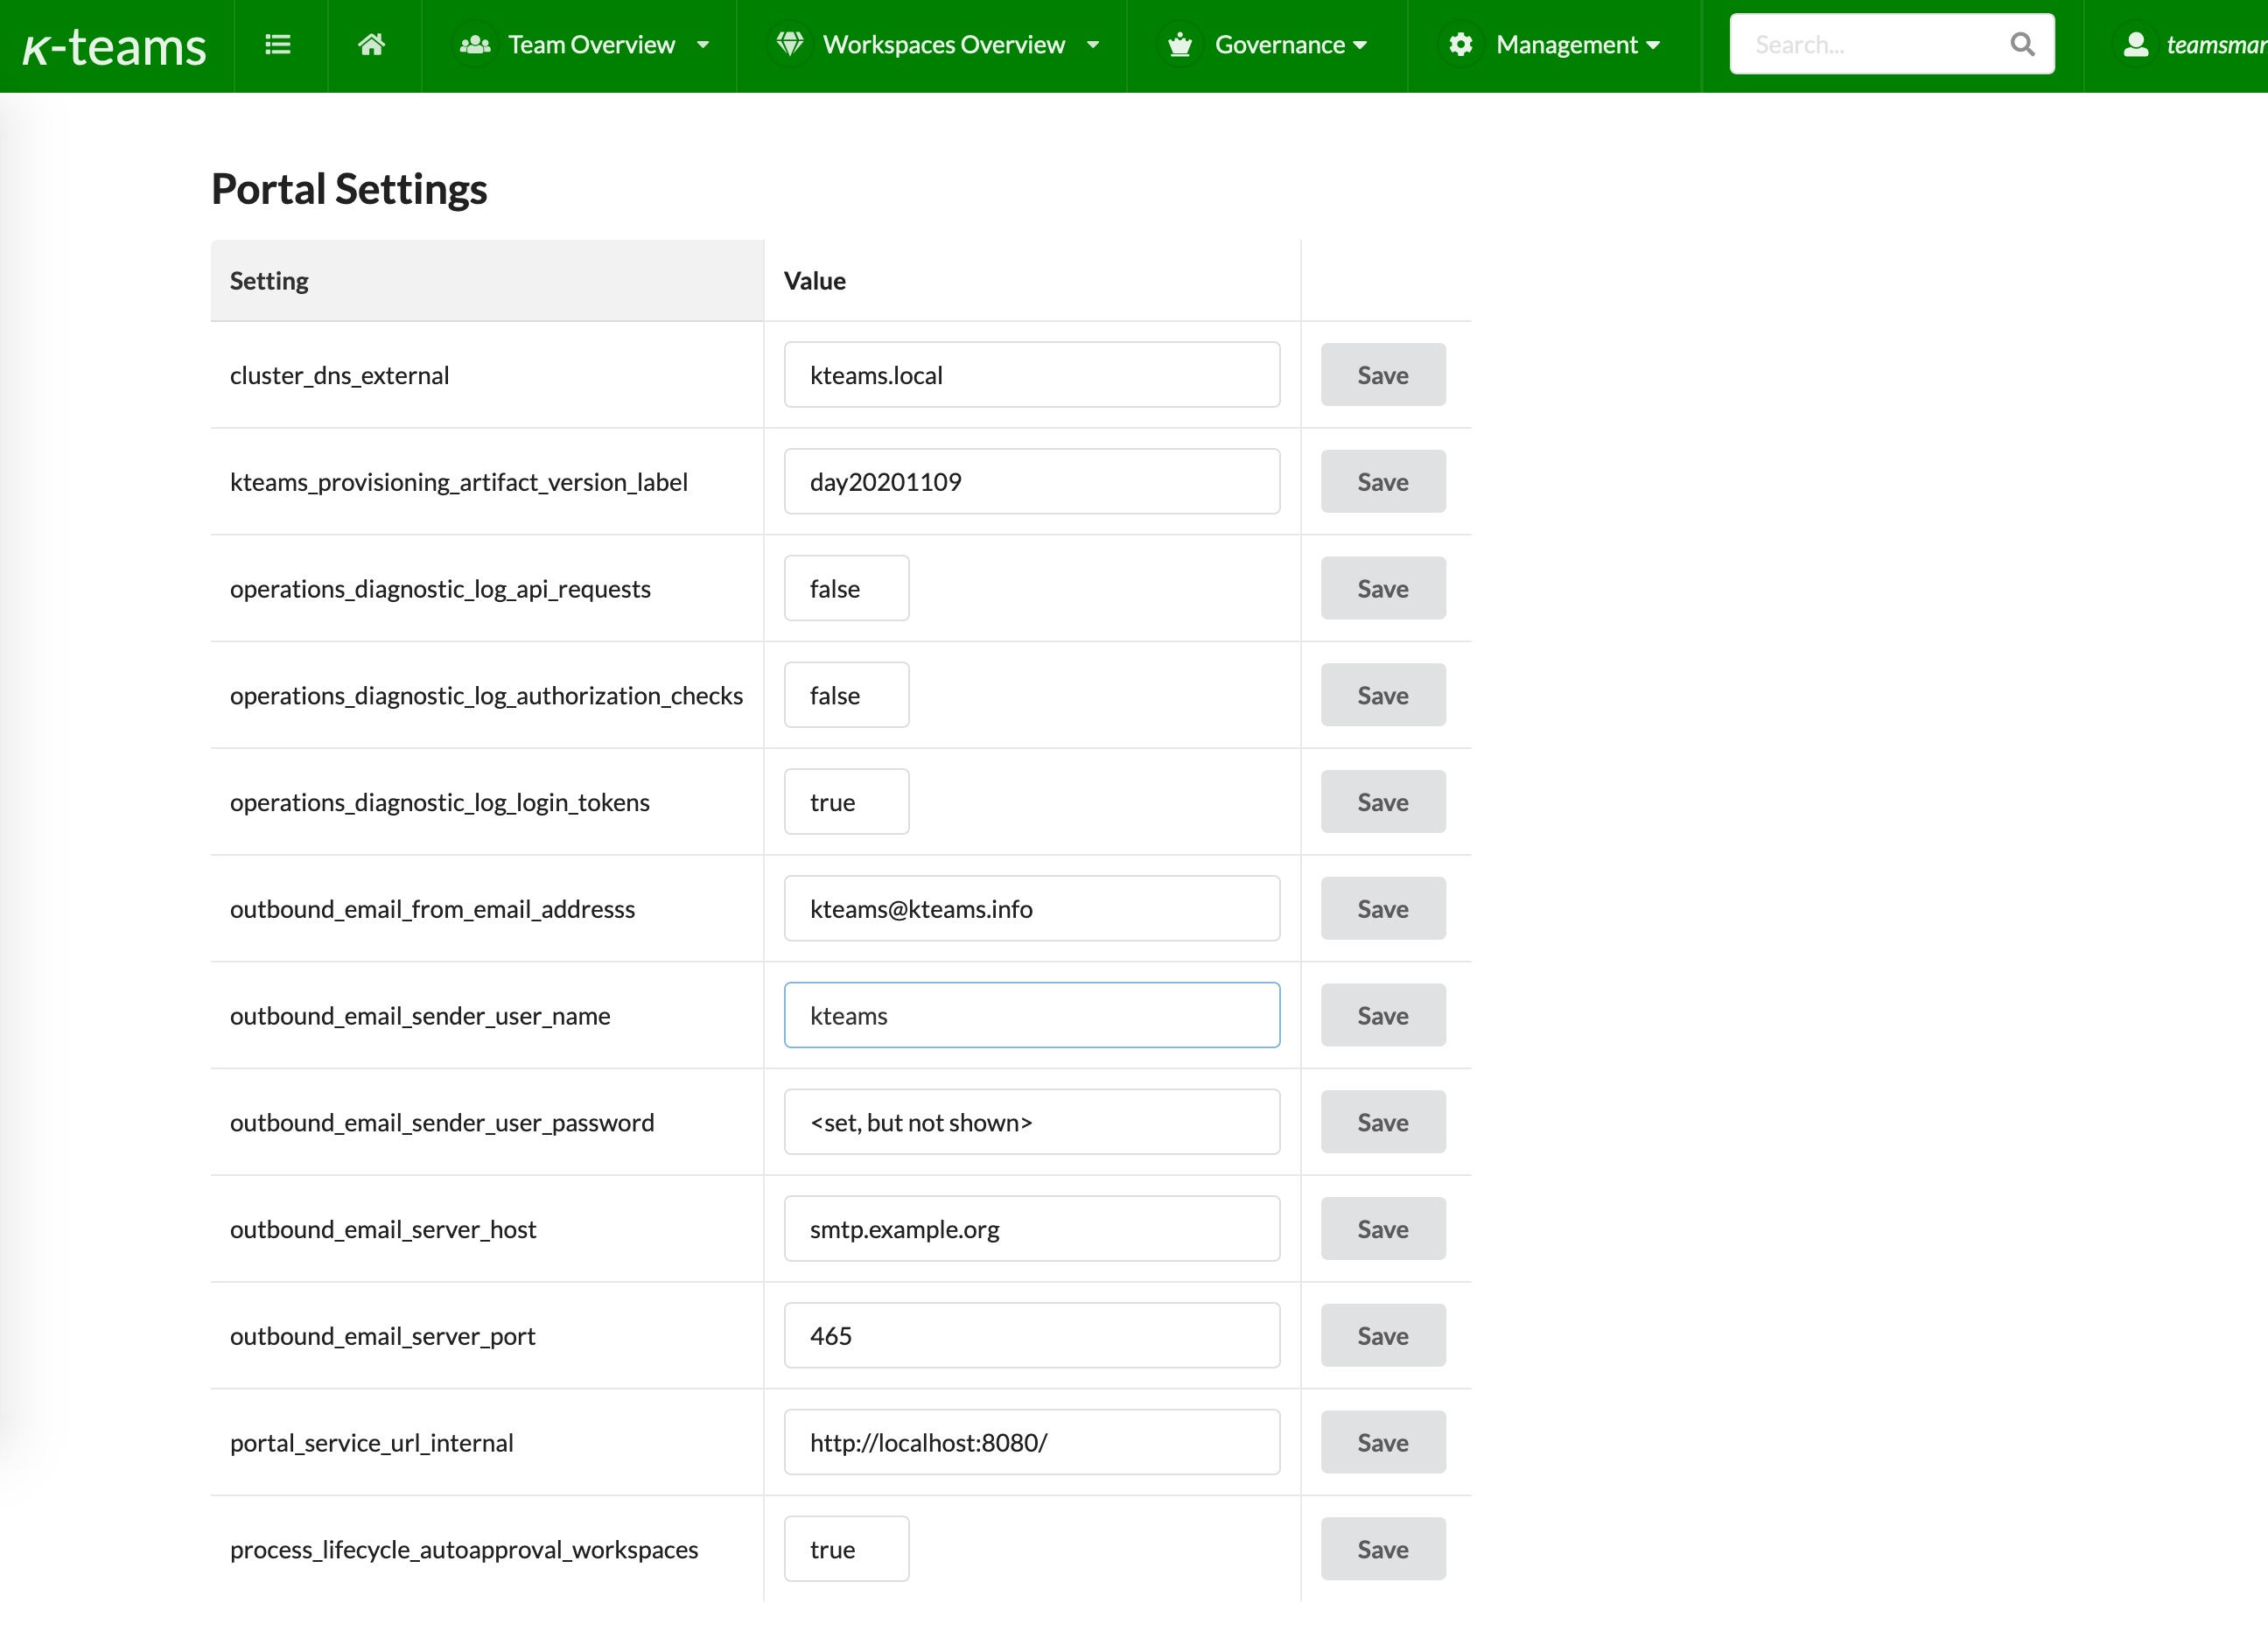
5.3.2. Setting up outbound emails
To configure the outbound email properly, you need to have some configuration settings ready. In your organisation, you typically need an IT person which sets up email for k-teams and supplies these values:
| Configuration name | Purpose | Recommendation |
|---|---|---|
outbound_email_from_email_address |
the email address which will appear in the "from:" field for every email sent by k-teams |
should look like "kteams@<your organisation email domain>", e.g. kteams@mycompany.com |
outbound_email_server_host |
the address of an SMTP email server under your control and access. must be reachable from your kteams installation. |
typically looks like "email.mycompany.com", "exchange.mycompany.com" or "smtp.mycompany.com" or the likes |
outbound_email_server_port |
the port of the SMTP email server. |
|
outbound_email_sender_user_name |
a user account on the email server |
often looks like an email address, but can look differently |
outbound_email_sender_user_password |
the password for that user account on the email server |
For every item in the table above, supply the correct value and then hit the related save button for that row.
You can test sending an email by adding to or removing yourself from a project, which should trigger an email. The log will printing a line like this in case of success, or the error:
2020/11/11 18:12:55 email sent successfully